Top 3 actions to improve Magento’s speed

The short version.

There is so much written about how to get the best out of a Magneto website but two years into working on a large site, there have only been 3 things that have caused a massive leap in site speed and performance:

  • A dedicated server
  • Implementing Lesti FPC
  • Truncating the core_url_rewrite table

The detail.

Shared vs dedicated server.

When you are starting your own ecommerce store, there is no reason why you need an expensive hosting solution. The mistake we made wasn’t in the cost, but in going with shared hosting rather than dedicated hosting; being on a server with many other websites rather than renting and controlling a server of our own.

The business was moving over to Magento and ran well on shared hosting while we were evaluating the Magento platform but after the site had launched and the product range increased to around 10,000 we started to experience problems.

We weren’t getting errors on the site or in the Admin Panel, the whole thing was just running REALLY slowly. To add to the frustration, the speed problems were intermittent meaning we didn’t recognise the issue and move to dedicated hosting as soon as we should have done. Following an investigation with the shared hosting company, they found that the severe changes in the performance of our site was due to another website on the server breaching the terms of use.

The move to a dedicated server with Fasthosts was relatively straight forward but it’s certainly a job that you will need a developer for if you aren’t familiar with setting up a server for Magento or moving a website. The hosting company we chose was one a colleague had good experience of and so far, they have provided a really good level of support – something you need to look for when choosing a hosting provider.

The site performance improved instantly and we finally have full server control.

Lesti FPC.

You can find Lesti Full Page Cache on Magento Connect and the best part is that it’s completely free. You will see from the reviews that this is a fantastic little extension that replaces the default full page cache in Magento.

core_url_rewrite table.

You can read more about this interested and highly annoying performance issue we encountered on a recent blog post.

How to track your site speed.

Google has some great tools for tracking site speed. PageSpeed and Google Analytics are particularly useful but another site we have used is GT Metrix.

Witterings on stock & order management – OrderHarmony

I’ve been lucky enough to work with OrderHarmony for the past few years. A fantastic online stock  order management system for wholesalers who want to manage orders & stock and automate their purchasing.

Here’s a few articles I’ve written for their blog:

Why you should care where your sales come from
10 reasons why bespoke inventory software can fail
Help! I can’t manage all of my products
How to choose good product codes
8 reasons to NOT manage your orders with spreadsheets

How to choose a good domain name for your ecommerce store

I’m about to embark on a new ecommerce adventure with my mother of all people! She has been a successful chiropodist for over 20 years now and would love to start an online store offering a range of footcare products that have been well tested over the years.

Having finally settled on Shopify as the hosted cart to build the site on (more information coming on that decision soon), I started to look at how to choose a good domain name for the site.

Top tips.

  1. Choose a domain name that contains the keyword of what we will be selling; this is very helpful for search engines so in our case I’ve been exploring the available domain names around “feet”, “footcare” and “footcare products”
  2. Choose a .co.uk address if you are mainly going to be selling your products in the uk

Then there’s the obvious stuff.

Choose a domain name that is:

  1. Short
  2. Memorable
  3. Easy to spell

You should also check out the domain names of your competitors as a similar one or using a .co.uk address when they are using .com could easily cause your potential customers to hit the wrong site.

Domain name search.

I always use 123-reg to register and manage my domain names. If you go to the site, it’s really easy to enter a ton if domain name ideas and see which are available.

Magento performance – Catalog URL rewrites

The short version.

    • If your Catalog URL index needs refreshing more frequently than normal, you possibly have an issue
    • Look out for you page speed suffering (we use Google Analytics and PageSpeed to keep an eye on this)
    • Truncating (clearing out) the Catalog URL index tables (core_url_rewrite table) in the database is the only way to fix it and restore site performance
    • It’s not a Magento bug and there is no “fix”. You just need to ensure that you keep an eye on the number of rows in Catalog URL table and clear it our regularly.
    • Once you have cleared out core_url_rewrite table, you need to run the Catalog URL index via the Admin Panel


The detail.

There are a ton of resources and posts about Magento performance as the platform is well known for having to be optimised in order to run really well. There will be many blog posts to come on the topic explaining what I have found works well and what didn’t…

However, I wanted to share my recent experience with a really tricky performance bug that we encountered.

We made some amends to the homepage design and as soon as they went live, the site started to grind to a halt. Our server response and page load times were simply awful and we had no idea why.

We went off on a chase trying to work out why the homepage redesign had “broken” the site speed, investigating both the changes we had made and the front-end page caching.

It turns out that the site performance degradation following the homepage redesign was nothing but a distraction. The issue was actually with the Catalog URL rewrites.

The clue was in the Admin Panel. For the weeks prior to the site grinding to a halt, we’d noticed that the Catalog URL reindex needed to be refreshed quite frequently; at least a few times an hour. The index was taking up to 5 minutes to refresh and that did not seem right.

We have thousands of products and many of those are in multiple categories. The Catalog URL rewrites index in Magento match descriptive URLs to the resources so you can imagine it has a lot of work to do! Here’s a great blog post about Magento’s URL rewriting.

We cleared out the core_url_rewrite table, reindexed the Catalog URL rewrites using the Admin Panel and the site speed issue simply disappeared.

The best way we have come up with to manage this is to simply check the core_url_rewrite table regularly and watch out for the indexing messaging popping up more than usual.

Magento “Is Anchor” category setting

What does the category “Is Anchor” setting do?

I was looking for a better way to show my product categories when the users are navigating to a particular section of the website.

By default, the layered navigation shows all categories and sub-categories that are active and set to “Include in Navigation”.

This is great, but this navigation does not change as you navigate the site; it shows which section the user in but not the sub-categories for the section of the site. For example, if I had a clothing store, the layered navigation would show:

T-shirts
Jumpers
Trousers
Skirts

If I was in the “Jumpers” section, the navigation opens and you can see the sub-categories:

T-shirts
Jumpers
– Men’s
– Women’s
– Children’s
Trousers
Skirts

Again, that is fine but it starts to get tricky when you have lots of product categories on your store like we do.

How do I only show sub-categories of the section my user is in.

I needed a way to show sub-categories of the section the user was in and I found you can do this using the “Is Anchor” setting on the “Display Settings” tab of a category.

The Magento "Display Settings" tab of a category

The Magento “Display Settings” tab of a category


What happens when “Is Anchor” is set to “No”.

A “Browse By” section will appear in your layered navigation area showing the sub-categories of the section you are in. Going back to my clothing store example where the user in is the “Jumpers” section, you would see the following in your layered navigation area:

Categories
T-shirts
Jumpers
– Men’s
– Women’s
– Children’s
Trousers
Skirts

Browse By
Men’s (53)
Women’s (34)
Children’s (129)

Because the “Browse By” section is so valuable to our users, we did a small amount of development work to move the “Browse By” section above “Categories”. The activity in our Google Analytics account is already showing lots of clicks so I think we did the right thing here!

What happens when “Is Anchor” is set to “Yes”.

The “Browse By” setting works really well for the majority of our product range but there are some products types we sell that are quite technical and therefore have a lot of product attributes.

If you change a category “Is Anchor” to “Yes” then a “Shop By” section will be shown in your navigation when the user click on the category on your website. This will show the attributes of the products assigned to that category.

shop by
Image taken from a Magento Knowledge Base article

How to get a product attribute to show in the layered navigation.

For the product attributes to show in the layered navigation you have to ensure that the attribute is set to “Use in Layered Navigation”.

You can select this option when you create an attribute but if you need to amend an existing one, go to “Catalog > Attributes > Manage Attributes” in the Magento Admin Panel.

Click on the attribute you want to manage then scroll down to the “Frontend properties” area. Change the “Use in Layered Navigation” to one of the following:

  • Filterable (with results) –  link appears in the navigation will appear when there are results for this attribute (i.e., 1 or more products has this attribute)
  • Filterable (no results) – link appears in the navigation even if there are no active products with this attribute

filterable attributes

When this is done, product attributes will be shown in the layered navigation for an category you have set to “Is Anchor” = “Yes”

Magento layered navigation – how it works

Which product categories does Magento display by default?

Magento layered navigation displays your Magento product categories if you have the following Category settings set to “Yes”

  • Is Active
  • Include in Navigation Menu

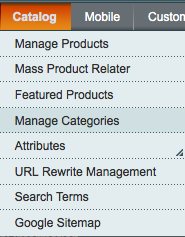
You find these settings after going to “Catalog > Manage Categories”

manage categories

And viewing the “General Information” tab.

general information

How are active categories shown on my Magento website?

You will see the category appear on the front-end of your website both in the main navigation and also down the left-hand side on the “layered navigation” area. However, the position of these menus may differ depending on the theme you are using and any customisations you have made.

Can I remove the layered navigation?

You cannot remove the layered navigation using the Admin Panel. You would have to make the changes in the front-end code.

How much control do I have over the layered navigation?

I was looking for a way to edit or remove the left-hand “Categories” navigation when I stumbled across the “Is anchor” option. It took a little while to work out what this was and how it’s used so I have created a separate blog post on the topic.

How to stop Google Analytics using data from internal traffic

Overview.

I’ve recently been spending a lot of time getting to grips with Google Analytics (more on that topic to come…!) so inline with my general approach to this blog I thought I’d post any findings that other folk may find of interest.

I’m currently looking at a homepage redesign of an ecommerce site running on the Magento platform and to help work out a new navigation and layout, I wanted to understand how users currently interact with the website.

The best way overview of this information in Google Analytics, for me, was using the “clicks” visualisation presented in the Google Analytics Dashboard.

As I was looking over this I soon realised that we needed to exclude any internal traffic sources. We have employees, a development team and company owner that all spend time on the site. When we have rolled new features or products out onto the live site, we obviously spend a lot of time testing it, not to mention the time people on customer support spend looking up product information using our lovely site search powered by Instant Search+.

So needless to say, when you first set-up Google Analytics on your site, ensure that you gather the IP addresses of internal users. The Google Analytics account owner will then be able to create filters to exclude your internal IP address.

The steps.

Log in to your Google Analytics account and click on “Admin” in the top-level navigation.

admin

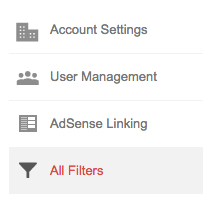
Then go to “All filters” in the left-hand navigation.

all filters

Click on the “New Filter” button.

new filter

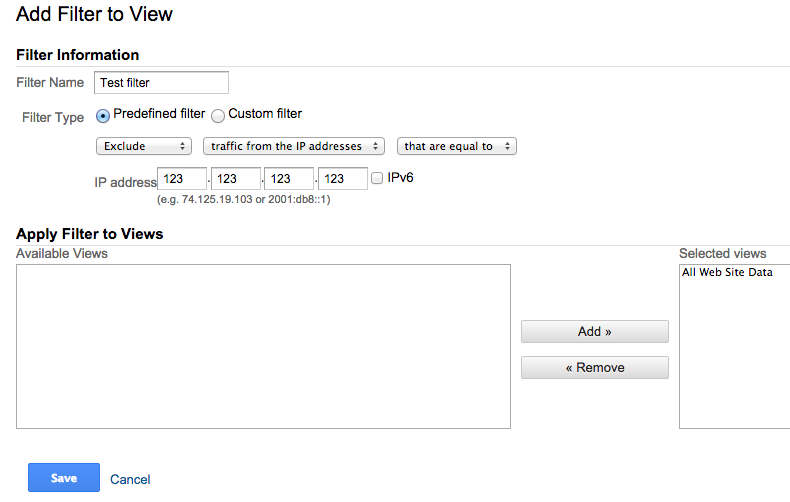
You can then choose the filter type and add the IP address data. There are various options, but in this case I simply want to exclude all traffic from a specific IP address so I did the following:

  • Entered a “Filter Name”
  • Selected “traffic from the IP addresses” “that are equal to”  using the drop-down menus
  • Added my IP address

Next you need to choose which views you want to apply the filter to. In this case, the only option shown in “Available Views” was “All Web Site Data”. I selected that line and clicked “Add >>” which added the View to the box containing the Views I want on the filter.

Add a filter

You can use this neat little site if you need to find you IP address.

One issue that I haven’t worked out how to tackle yet is dynamic IP addresses. Some people’s machines will be assigned a different IP address by their ISP at various times. These sometimes operate within a range so you could add an IP range when you create your filter in Google Analytics.